Aim
These types of grids can be used to arrange single letters, groups of letters or perhaps words into a modelled order. As well as being great spelling practice and aiding letter recognition skills, you could reinforce phonics work, use photos or symbols instead of letters for sequencing activities, letter / picture finding, letter / picture orientation.
Select ‘New Grid Set’ and then choose ‘Modelled Sentence Building _5x1’. Click ‘Create’ and you will see that a new grid appears under the writing window. It has one long cell which will show the word correctly spelt, for your student to copy. Underneath there are five smaller cells. Click ‘File’ and ‘Save Grid Set As’ – name your grid, select a folder to save it into and click Save.

In this exercise we will put just one letter in each cell, either in the correct order, or for more able students, the letters could be jumbled up. There is also a cell containing a full stop in this template and a red arrow which will take the student to the next grid.
The cell containing the full stop is not needed so we will delete it. Click ‘Edit’ and choose ‘Edit Mode’. This is the teacher’s mode and allows the grids to be altered. Move your mouse over the cell with the full stop in it and right-click. Choose ‘Delete’ and confirm ‘Yes’. If there are too many cells for each to contain one letter, delete others in the same way.
To add more cells you will first need to make the others smaller. Hold down the Control key and click in each of the four small square cells. You will notice that they now appear shaded. When you alter the dimensions of any of the shaded cells, they will all change at the same time. Move your mouse to the corner of one cell and hold down your left mouse button whilst you drag to shrink the cell.

Now click on the background to remove the shading (ungroup) and you can move each cell across to make room for the others you wish to add. In this example, I need six cells. To add another cell, move your mouse over one you want to duplicate and right click. From the drop down menu choose ‘Copy’. Now move the mouse so the pointer is over the blue background and right click again, select ‘Paste’. A duplicate cell will appear that you can move to the desired position. Repeat this last step until you have the desired number of cells.
Now that the grid contains the right number and type of cells for your activity, you simply need to fill it in. Hold down ‘Shift’ and left-click to see a flashing caret marker, ready for you to type. Complete the Modelled word cell, and the letter cells.

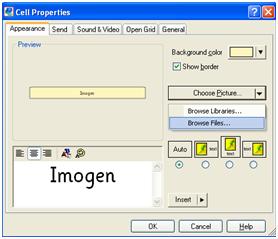
This activity will be made more engaging by using a picture next to the name in the Modelled word cell. To insert a picture move your mouse over the Modelled word cell, right-click and choose ‘Properties’. On the ‘Appearance’ tab you will see a button called ‘Choose Picture’ select this and browse to find the picture of your choice. Click on your picture file and then choose ‘Open’. This inserts your picture and the Appearance tab gives you a preview of how the cell will look.
Above ‘Choose Picture’ there is a button called’ Background Colour’. In the example I have also changed the colour of the background of the Modelled word cell to make it look very different to the letter cells. When you are happy with the cell’s appearance, click ‘OK’.
Any aspect of the appearance of all the cells in your activity can be changed, such as font size / style, colour, cell shape, picture /symbol … this is all achieved by exploring the options of the Cell Properties window.

The finished example gives a clear and simple exercise for a student working towards spelling. I have reduced the size of the Modelled word cell and enlarged the font within in to reduce visual clutter. Each cell can be set up to do different things when it is clicked on by a student. The Modelled word cell in this example is set to read out its contents when it is clicked on, but nothing will appear in the writing window above. The other cells, containing single letters, will ‘send’ their contents to appear in the writing window. To try out your grid as a pupil would see it, click ‘Edit’ and ‘Edit Mode’ to remove the tick.
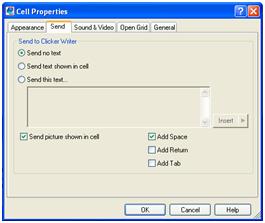
Because I want the student to have a picture prompt next to their work, I have changed the Modelled word cell to send only the picture in it up to the writing window when it is clicked.

To achieve this, return to Edit Mode and right click over the Modelled word cell. Choose ‘Properties and select the ‘Send’ tab. One of the options here is to check the box marked ‘Send picture shown in cell’. Now click OK. Again, test out your grid by leaving ‘Edit Mode’ and clicking in each cell as your pupils would. Think of all the different ways this template could be useful. Remember to save your work.
If you like this spelling activity it can be downloaded from CENMAC’s section of the Learning Grids website. Please ask your tutor for more details. Other guides in this series will show you how to change the appearance of cells, how to add sound, your own pictures, how to add and delete other cells and many more related activities. Good luck and do send us any simple literacy activities that you make so that we can share all Clicker 5 resources.


